Scope
This guide is for fixed-cell and tissue immunofluorescence in which signal or background varies across a specimen, slide, field, tile, z-plane, staining batch, or imaging cycle. It covers cultured cells, frozen sections, FFPE sections, direct and indirect detection, low-plex panels, and whole-slide or multiplex imaging.
Uneven staining describes what the image looks like; it does not identify the cause. First determine whether the pattern follows the physical experiment, the imaging setup, or reproducible biology.
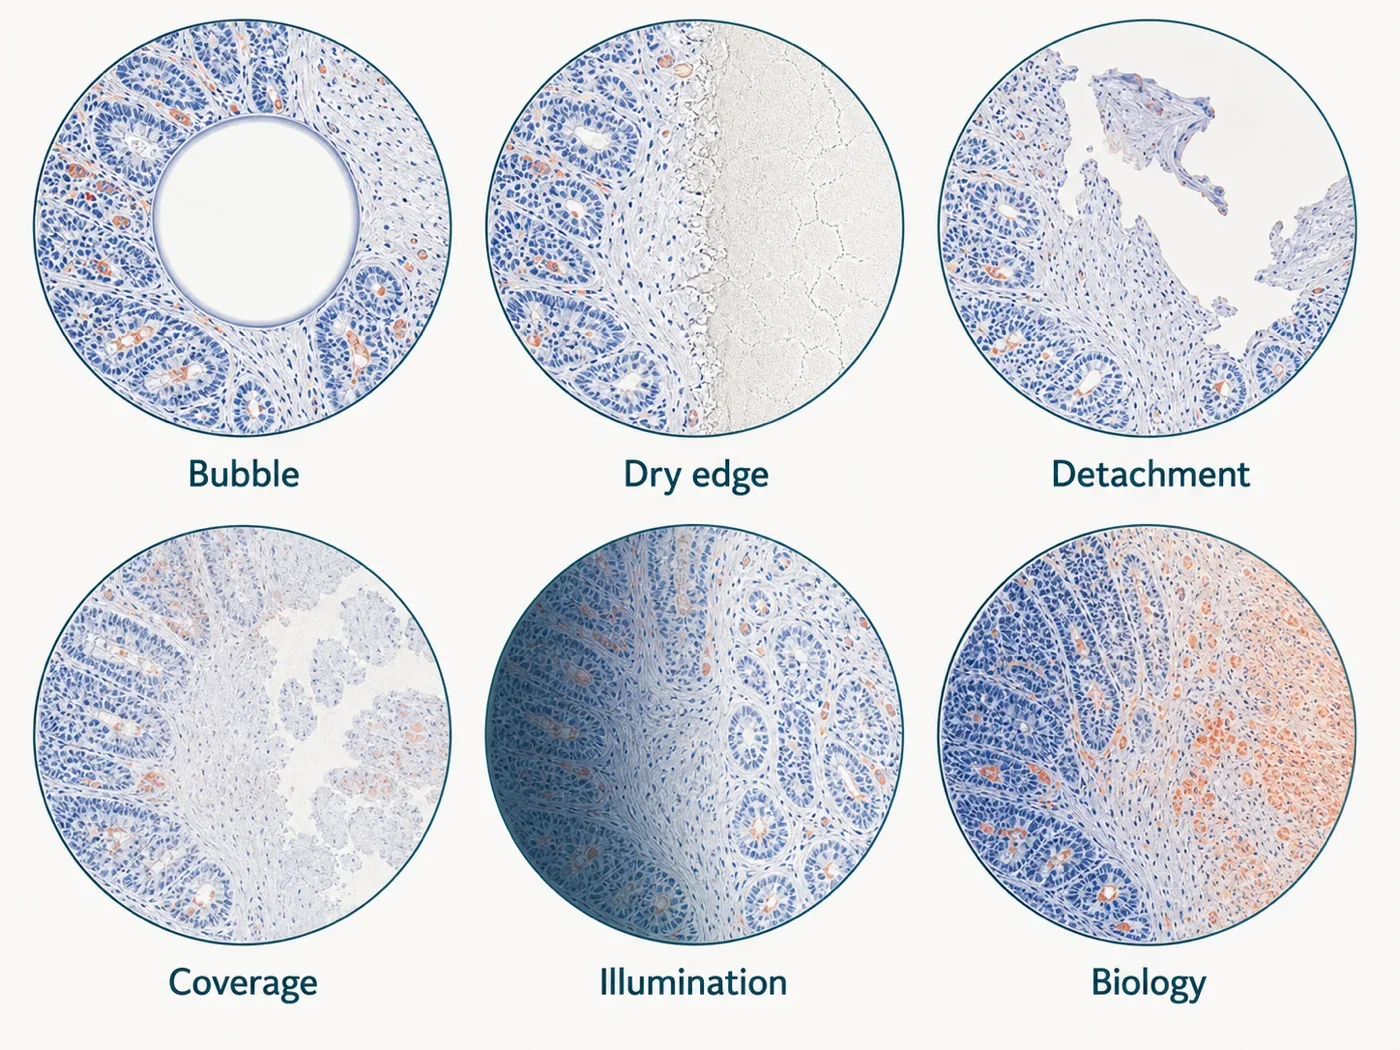
Quick check: what does the pattern line up with?
| Pattern follows | Likely explanation | Check next |
|---|---|---|
| Slide edge, hydrophobic barrier, coverslip edge, circular blank region, or liquid boundary | Coverage, drying, meniscus, evaporation, bubble, or mounting artifact is more likely | Inspect the physical slide, incubation volume, humidity, bubbles, and a repeat with unchanged reagents |
| Tissue fold, tear, chatter, thick region, lifted edge, or missing section | Sectioning, adhesion, thickness, retrieval stress, washing, or focus is more likely | Transmitted-light morphology, nuclear channel, z-stack, and adjacent section |
| The same left-to-right or center-to-edge direction in every specimen | Slide orientation, chamber level, reagent flow, illumination, detector field, or acquisition order is more likely | Rotate the specimen or slide and image a uniform fluorescent reference |
| Field, tile, row, column, or stitching boundary | Illumination, focus, exposure, stage, tile overlap, stitching, or flat-field problem is more likely | Raw tiles, stage coordinates, focus map, exposure metadata, and a uniform reference |
| Only one channel or one antibody | Marker-specific coverage, antibody aggregate, access, fluorophore, channel, or target biology is more likely | Singleplex, single-color, positive, negative, and morphology controls |
| The same anatomical compartment in independent sections and markers | True biological heterogeneity becomes plausible | Replicate sections, independent marker or method, and blinded acquisition under fixed settings |
Use the shape of the pattern to narrow the cause
| Pattern shape | Common causes | Check |
|---|---|---|
| Sharp circular or oval blank area | Bubble during incubation, wash, retrieval, or mounting | Look for a matching boundary in brightfield, nuclear stain, or mountant and repeat after removing bubbles |
| Bright or dark perimeter | Drying, meniscus concentration, barrier geometry, incomplete coverage, coverslip pressure, or edge illumination | Review humidity, volume, wetness record, barrier shape, and whether the pattern rotates with the slide |
| Smooth gradient across the slide | Slide tilt, reagent pooling, evaporation, directional washing, illumination gradient, or detector response | Repeat on a level chamber, rotate slide orientation, and image a uniform fluorescent reference |
| Alternating bands or chatter | Microtome or cryostat sectioning artifact, compression, vibration, or blade problem | Inspect unstained morphology and a newly cut section |
| Patch follows a fold | Locally increased thickness, multiple tissue layers, poor reagent access, or focus mismatch | Check whether all channels, including nuclear stain and autofluorescence, increase in the same region |
| Central dark region with brighter surface or edge | Limited penetration, excessive thickness, incomplete deparaffinization, reagent access, or optical attenuation | Review section thickness, z-profile, wetting, and a thinner or better-accessed comparison |
| Repeated grid or tile pattern | Uneven illumination, per-tile exposure, focus map, stitching, or flat-field failure | Inspect unstitched tiles and an empty or uniform-reference channel |
| Irregular isolated bright particles | Antibody aggregate, precipitate, debris, dust, or mounting artifact | Check omission controls, reagent quality, blank slide, and whether particles sit above the tissue plane |
Step 1: check coverage, bubbles, and drying
Once a hydrated specimen enters blocking and antibody steps, unplanned drying can concentrate protein, change binding, damage morphology, and create sharp spatial boundaries. Complete coverage matters more than a nominal reagent volume because tissue size, barrier geometry, slide angle, chamber design, and evaporation differ.
- Confirm that every specimen remained visibly covered during blocking, primary, secondary, amplification, counterstain, and intermediate washes
- Record the actual volume, barrier area, chamber humidity, temperature, incubation duration, and whether the chamber was level
- Check for bubbles before and after every transfer, especially beneath sections, in thick cryosections, and under coverslips
- Prevent pipette tips or aspirators from touching, scraping, or locally drying the specimen
- Use gentle, consistent solution exchange that removes old reagent without creating exposed islands
- Keep light-sensitive incubation covered without sealing the chamber in a way that causes condensation to drip onto selected regions
| Observation | Likely coverage problem | Repeat to try |
|---|---|---|
| One side consistently brighter | Pooling or concentration on a tilted slide | Repeat with the same reagents on a level chamber and reverse slide orientation |
| Bright rim around a hydrophobic barrier | Meniscus or local drying | Increase coverage area or adjust the barrier while holding antibody concentrations fixed |
| Patchy blank islands with sharp edges | Bubbles or incomplete wetting | Repeat after bubble removal and document coverage before incubation |
| Late-incubation edge haze | Evaporation and concentration | Improve humidity and verify the same volume at start and end |
Step 2: inspect the section before interpreting staining
| Physical problem | How it creates uneven signal | Check |
|---|---|---|
| Fold or wrinkle | Multiple tissue layers increase signal and disrupt focus, segmentation, and reagent access | Transmitted-light image, nuclear density, z-stack, and adjacent section |
| Compression or chatter | Alternating thickness and distortion create stripes or repeating intensity changes | Unstained morphology and a newly cut section with documented blade and cutting conditions |
| Partial lifting or detachment | Regions lose tissue, reagent contact, focus, or alignment | Section outline before and after retrieval, washing, and imaging |
| Tear or missing tissue | Blank regions can be mistaken for marker-negative biology | Brightfield, nuclear stain, and serial section |
| Uneven section thickness | Changes fluorophore amount, optical path, background, penetration, and apparent cell density | Thickness record, z-extent, morphology, and a validated uniform section |
| Necrosis or damaged tissue | Can increase nonspecific binding, autofluorescence, loss of nuclei, and segmentation errors | Morphology reference and region-specific negative controls |
Step 3: check thickness and antibody access
Thin adherent cells and routine thin sections should not automatically be described as having a penetration problem. Access becomes more plausible when the specimen is thick, poorly wetted, incompletely deparaffinized, densely cross-linked, or stained as a whole mount.
| Pattern | Possible cause | Comparison to try |
|---|---|---|
| Surface bright, deeper planes weak | Limited antibody penetration, optical attenuation, or incomplete permeabilization | Acquire a z-profile with a structural marker and compare one thinner or validated-access condition |
| Edges bright, center weak in a thick specimen | Diffusion distance, poor agitation, incomplete wetting, or insufficient incubation | Keep antibody concentration fixed and compare one access variable at a time |
| Patchy FFPE signal with wax-like or hydrophobic regions | Incomplete deparaffinization or rehydration | Repeat the clearing and graded rehydration sequence before changing retrieval or antibodies |
| Signal changes with fold thickness in all channels | Section thickness rather than marker biology | Exclude the fold and compare a flat serial section |
| Only one intracellular compartment is patchy | Fixation, permeabilization, extraction, or target-specific access | Use a compartment marker and one controlled preparation comparison |
Do not increase permeabilization, retrieval, antibody concentration, and incubation together. If several variables change at once, a brighter center does not show which change helped or what structure was damaged.
Check specimen-specific factors
Cultured cells
Check seeding density, substrate coating, attachment, cell loss during aspiration, local confluence, treatment delivery, fixation timing, reagent coverage, meniscus effects, well-edge evaporation, plate flatness, focus, and illumination. Compare multiple wells and positions rather than one field.
Frozen sections
Check block temperature, blade, compression, folds, tears, condensation, section thickness, adhesion, post-section fixation, trapped air, OCT residue, drying, storage, and whether harsh retrieval lifted selected regions.
FFPE sections
Check section age, charged slide, baking, deparaffinization, rehydration, residual paraffin, tissue folds, retrieval immersion, buffer volume, slide load, temperature uniformity, cooling, tissue retention, and local drying.
Whole mounts and thick specimens
Check fixation depth, permeabilization, diffusion distance, reagent volume, agitation, incubation, optical attenuation, clearing or refractive-index matching, z-dependent background, and whether the target is physically accessible.
Step 4: check whether imaging created the unevenness
| Imaging factor | Artifact | Check |
|---|---|---|
| Illumination alignment | Center-to-edge shading or one-sided gradient | Image a uniform fluorescent reference and verify instrument alignment |
| Objective and immersion | Local blur, dim regions, spherical aberration, or field curvature | Check objective, immersion medium, coverslip thickness, correction collar, and focus across the field |
| Focus and specimen flatness | One region or tile is out of focus | Review focus map, nuclear channel, z-stack, and whether tissue lies flat |
| Exposure or gain | Per-field auto-exposure creates artificial intensity differences | Inspect metadata and reacquire using one documented unsaturated rule |
| Photobleaching | Signal declines with field, tile, z-plane, or channel order | Reverse acquisition order, compare first and last frames, and reduce unnecessary illumination |
| Flat-field correction | Incorrect or mismatched reference introduces or worsens gradients | Inspect raw image, reference image, corrected image, and correction residuals |
| Display processing | Local contrast, adaptive background, or auto-scaling exaggerates patchiness | Inspect raw values with a common display range |
Flat-field correction is appropriate only when the reference represents the illumination and detection pattern of the actual optical configuration. It should not be used to conceal biological or staining nonuniformity.
Check multiplex and whole-slide imaging
- Inspect raw tiles before stitching. Determine whether the problem originates in staining, per-tile illumination, focus, exposure, or software assembly.
- Use empty and structural channels. Uneven illumination may be visible in an empty channel; folds, bubbles, and out-of-focus regions are often clearer in the nuclear or morphology channel.
- Check cycle stability. Compare section outline, nuclei, registration, and tissue area across cycles for movement, progressive loss, or stripping damage.
- Return the affected marker to singleplex. Confirm whether patchiness exists before multiplex order, amplification, fluorophore reassignment, or cyclic treatment.
- Review tile overlap, stitching, and registration. Preserve unstitched images and quality-control masks.
- Define exclusion rules before analysis. Flag folds, bubbles, debris, failed focus, saturation, tissue loss, and illumination artifacts before cell segmentation or phenotyping.
When the pattern may reflect real biological variation
Consider a spatial gradient or patch as biology only after the main physical, staining, and imaging explanations have been checked.
- The pattern follows a defined anatomical, cellular, treatment, or disease compartment rather than slide, tile, edge, fold, or acquisition coordinates
- The same pattern recurs in independent biological specimens and adjacent or replicate sections
- A known-positive control confirms the staining workflow across the full slide or batch
- Target-negative and detection-layer controls do not reproduce the pattern
- Unstained material does not show the same distribution
- An independent antibody, orthogonal assay, morphology marker, or biological perturbation supports the regional difference
- The pattern remains under fixed, unsaturated acquisition and after excluding damaged regions
- The sampling and field-selection plan was defined before viewing the final marker distribution
Report heterogeneous staining as an observed spatial distribution unless the evidence supports a stronger mechanistic claim.
Required controls
| Control | What it checks | What failure looks like |
|---|---|---|
| Transmitted-light or morphology reference | Does patchiness follow folds, tears, thickness, detachment, bubbles, or missing tissue? | The marker pattern coincides with physical damage |
| Preparation-matched unstained specimen | Does intrinsic or material fluorescence create the same spatial pattern? | The patch is present without antibody labeling |
| Known-positive control across the same batch | Was the complete staining process spatially competent? | The same directional or regional failure appears in the control |
| Target-negative and detection-layer controls | Does the patch depend on the target and primary antibody? | The same spatial pattern persists without the intended target layer |
| Single-color and singleplex controls | Is the pattern caused by one fluorophore, channel, antibody, or multiplex interaction? | Patchiness appears only after panel assembly or in a neighbouring channel |
| Uniform fluorescent reference | Is illumination and detection uniform across the field? | A center-edge or directional gradient appears without a biological specimen |
| Serial or replicate section | Does the pattern recur with tissue anatomy rather than section damage? | The patch changes with folds, tears, or section position |
| Acquisition-order control | Does bleaching or drift create a time-dependent gradient? | Reversing order reverses the intensity trend |
Choose one next test
| Current result | Next test | Keep unchanged |
|---|---|---|
| Sharp circular blank area | Repeat the same staining after removing bubbles and documenting complete coverage | Do not change antibody concentration or retrieval |
| Bright edge or directional gradient | Repeat on a level humidified chamber with reversed slide orientation | Keep reagents, times, and acquisition fixed |
| Patch follows a fold or thick region | Compare a flat serial section | Do not normalize the folded region into the analysis |
| All channels share a center-edge gradient | Image a uniform fluorescent reference and inspect raw illumination | Do not alter staining first |
| Only one marker is patchy | Run that marker as singleplex with positive, negative, and morphology controls | Keep specimen preparation and acquisition fixed |
| Patch appears only after multiplex cycles | Compare nuclear registration and tissue area across cycles, then rebuild from the last valid cycle | Do not retune every marker simultaneously |
| Pattern follows anatomy in replicate sections | Add one independent marker or orthogonal method using predefined fields | Do not infer mechanism from one antibody alone |
When the uneven-staining problem is resolved
- The specimen remained continuously wet and fully covered during all relevant incubations
- Bubbles, folds, tears, chatter, tissue loss, thickness variation, and damaged regions are absent or excluded by a predefined rule
- Known-positive material stains consistently across the required area and batch
- Unstained, target-negative, and detection-layer controls do not reproduce the target pattern
- Illumination, focus, exposure, detector response, tile stitching, and registration are documented and acceptable
- No required region is saturated, out of focus, detached, or outside the validated z-range
- Any flat-field, stitching, unmixing, or normalization step uses matched references and retains raw data
- The final spatial pattern repeats across the specimens, sections, days, operators, and instruments required by the study
- Regions excluded from analysis and reasons for exclusion are recorded before biological interpretation
- Biological heterogeneity is supported by evidence independent of the physical staining pattern
A smooth final image does not by itself show that staining was uniform. Check the specimen, controls, raw tiles, morphology, and quantitative range.
Common uneven-staining patterns
| Pattern | Likely cause | Check |
|---|---|---|
| Circular blank patch | Bubble or incomplete wetting | Brightfield, mountant, nuclear stain, and repeat without bubbles |
| Bright tissue edge | Drying, meniscus concentration, barrier geometry, or thinner edge | Humidity, volume, wetness record, and serial section |
| Dark tissue edge | Detachment, incomplete coverage, retrieval damage, or field illumination | Section outline, morphology, and uniform reference |
| Fold is bright in every channel | Locally increased thickness | Nuclear density, z-stack, transmitted light, and flat serial section |
| One side of every slide is brighter | Slide tilt, reagent pooling, chamber geometry, or illumination | Reverse orientation and image a uniform reference |
| Tile-by-tile intensity changes | Per-tile exposure, focus, illumination, stitching, or flat-field problem | Unstitched raw tiles and metadata |
| Signal disappears in later cycles | Tissue movement, progressive loss, stripping, bleaching, or registration failure | Cycle-specific nuclear and morphology overlays |
| Patch follows the same anatomical compartment in replicates | Possible biological heterogeneity | Independent marker, orthogonal evidence, and fixed acquisition |
Common troubleshooting mistakes
| Mistake | Why it fails | Better approach |
|---|---|---|
| “Patchy staining means the antibody concentration is too low.” | Drying, bubbles, folds, tissue loss, illumination, and focus can create the same pattern. | Locate the pattern in physical and imaging coordinates first. |
| “Increase antibody volume and concentration together.” | Coverage and binding effects become inseparable. | Correct coverage while keeping concentration fixed. |
| “A fold can be corrected by normalization.” | Multilayered tissue changes cell density, focus, background, and segmentation. | Exclude the fold or use a valid flat section. |
| “Flat-field correction fixes all gradients.” | It addresses optical field nonuniformity, not drying, pooling, penetration, tissue damage, or biology. | Use a matched uniform reference only after physical causes are excluded. |
| “If the gradient follows anatomy, it must be biological.” | Section thickness, retrieval, fixation, necrosis, blood, and region-specific autofluorescence can also follow anatomy. | Use replicate sections, controls, and independent evidence. |
| “Smooth stitching means the whole-slide image is valid.” | Focus, saturation, tissue loss, registration, and per-tile intensity errors can remain hidden. | Inspect raw tiles and quality-control maps. |
| “Local contrast makes patchy data comparable.” | Adaptive display changes can exaggerate or suppress regional differences. | Preserve raw data and use one documented quantitative rule. |
What to record
- Specimen identity, biological replicate, tissue or cell type, treatment, region, expected distribution, and unit of interpretation
- Spatial description and coordinate system of the defect: slide, barrier, edge, fold, anatomy, well, field, tile, z-plane, batch, or imaging cycle
- Images of the physical slide, transmitted-light morphology, nuclear channel, section outline, raw marker channels, and tile map
- Section thickness, cutting conditions, blade, folds, tears, chatter, adhesion, drying, condensation, detachment, and storage
- Deparaffinization, rehydration, retrieval, buffer volume, device, slide load, temperature, immersion, cooling, and tissue retention
- Blocking, antibody and wash volumes, barrier area, chamber level, humidity, temperature, duration, bubbles, aspiration method, and wetness observations
- Primary and detection reagents with supplier, catalog number, clone, lot, concentration, fluorophore, incubation, and reagent quality
- Unstained, known-positive, target-negative, omission, single-color, singleplex, serial-section, morphology, and uniform-reference controls
- Microscope, objective, immersion, excitation, emission, detector, exposure, gain, focus map, z-step, acquisition order, tile overlap, stitching, registration, and flat-field reference
- Excluded regions, next test, variable changed, acceptance decision, raw-file location, processing, repeat count, and revalidation trigger
References and protocol sources
- Immunofluorescence (IF) troubleshooting guide Technical guide
Cell Signaling Technology
Sample drying, fixation, washing, reagent handling, and other common causes of inconsistent or uninterpretable immunofluorescence.
- Application verification testing for immunohistochemistry (paraffin) Manufacturer protocol
Thermo Fisher Scientific
Removal of bubbles during solution exchange, continuous wetting after rehydration, complete reagent coverage, humidified incubation, gentle washing, and section handling.
-
Jennifer C. Waters . Journal of Cell Biology (2009) . DOI: 10.1083/jcb.200903097
Illumination alignment, field nonuniformity, flat-field correction, acquisition settings, saturation, and limits of quantitative fluorescence comparisons.
-
Gregory J. Baker and colleagues . Nature Methods (2024) . DOI: 10.1038/s41592-024-02328-0
Tissue folds, aggregates, debris, air bubbles, out-of-focus regions, uneven tile illumination, stitching, registration, tissue movement, and progressive tissue-loss artifacts in multiplex tissue imaging.
- Selecting optical filters for fluorescence microscopy Technical guide
Thermo Fisher Scientific, Molecular Probes Handbook
Excitation filters, dichroic beamsplitters, emission filters, spectral separation, autofluorescence rejection, and instrument-aware optical trade-offs.
- Background fluorescence and ways to reduce it Technical guide
Thermo Fisher Scientific
Separation of instrument, sample, vessel, medium, unbound-label, and treatment-related fluorescence; use of matched label-free controls and alternate channels.
- Immunofluorescence protocol for frozen tissue (IF-F) Manufacturer protocol
Cell Signaling Technology
Charged slides, cryosection thickness, fixation, blocking, antibody incubation, washing, and mounting starting conditions.
- FFPE tissue high-pH antigen retrieval, direct fluorescent method Manufacturer protocol
Thermo Fisher Scientific
Slide warming, deparaffinization, graded rehydration, high-pH HIER, cooling, staining, and storage.
- The Society for Immunotherapy of Cancer statement on best practices for multiplex immunohistochemistry and immunofluorescence staining and validation Consensus guideline
Janis M. Taube and colleagues . Journal for ImmunoTherapy of Cancer (2020) . DOI: 10.1136/jitc-2019-000155
Singleplex-first panel development, marker-level controls, multiplex-to-singleplex concordance, and revalidation after panel changes.
- Society for Immunotherapy of Cancer: updates and best practices for multiplex immunohistochemistry and immunofluorescence image analysis and data sharing Consensus guideline
Janis M. Taube and colleagues . Journal for ImmunoTherapy of Cancer (2025) . DOI: 10.1136/jitc-2024-008875
Acquisition, segmentation, phenotyping, quality control, batch correction, and sharing of raw and processed outputs.