Scope
This protocol is intended for fixed adherent cells grown on coverslips, chamber slides, or optically suitable imaging plates. It describes indirect immunofluorescence with an unlabeled primary antibody and a fluorophore-conjugated secondary antibody.
Use a different workflow for live-cell surface labeling, suspension cells, frozen tissue, FFPE tissue, or cyclic multiplex imaging. Product-specific antibody instructions take priority when they specify a validated fixation or permeabilization method.
Before you start
| Check | Why it matters | Record |
|---|---|---|
| Expected target location | Surface, cytoplasmic, cytoskeletal, organellar, and nuclear targets require different access and preservation strategies. | Expected pattern, antibody validation application, and any relevant knockout or localization evidence. |
| Structure that must be preserved | A condition that exposes one epitope may extract lipids, redistribute soluble proteins, or damage another structure. | Cell outline, membrane continuity, organelle pattern, cytoskeletal architecture, and positive-control morphology. |
| Control plan | A bright image alone cannot distinguish target-dependent labeling from secondary background, intrinsic fluorescence, or cross-reactivity. | Unstained, secondary-only, known-positive, and target-negative controls; single-color controls for multichannel work. |
| Acquisition plan | Changing exposure or gain between groups can create an apparent biological difference. | Microscope, objective, channel, exposure, gain, binning, z-step, and processing rules. |
Plate cells early enough to attach and recover, but avoid a density that obscures cell boundaries or changes the biology being studied. Thermo Fisher's cultured-cell starting protocol uses roughly 60–80% confluence as an example rather than a universal target.
Materials and reagents
| Category | Required | Selection notes |
|---|---|---|
| Imaging surface | Coverslip, chamber slide, or glass-bottom vessel compatible with the objective | Confirm coating, optical thickness, solvent compatibility, and cell attachment. |
| Wash buffer | PBS or TBS | Use one defined formulation consistently across comparison groups. |
| Fixative | Fresh 4% formaldehyde in buffer or ice-cold 100% methanol | Select from antibody validation and the structure that must be preserved; do not assume the two routes are interchangeable. |
| Permeabilization reagent | A validated detergent after aldehyde fixation when intracellular access is needed | Triton X-100 is a common starting reagent but can extract membrane-associated material. Methanol fixation already permeabilizes cells. |
| Blocking and antibody diluent | Normal serum, BSA, or a validated commercial buffer | Normal serum is commonly matched to the host species of the secondary antibody. Avoid components that conflict with the detection system. |
| Primary antibody | Antibody validated for immunofluorescence in the relevant species and sample preparation | Record supplier, catalog number, clone, lot, concentration, dilution, and validation evidence. |
| Secondary antibody | Fluorophore-conjugated, host-specific secondary antibody | Use a secondary reactive to the primary-antibody host; highly cross-adsorbed reagents are preferred for multiplex work. |
| Counterstain and mounting medium | Nuclear stain as needed; antifade mounting medium | Choose fluorophores and mounting medium compatible with the microscope and planned storage. |
| Handling | Humidified chamber, fine forceps, light protection | Use enough volume to cover the sample and prevent drying throughout staining. |
Common starting conditions
These starting conditions are taken from current manufacturer protocols. Test them for the antibody, cell type, treatment, and target compartment used in your experiment.
| Stage | Starting condition | Check |
|---|---|---|
| Formaldehyde fixation | 4% formaldehyde for 10–15 minutes at room temperature | Common starting route for morphology preservation; usually followed by a separate permeabilization step for intracellular targets. |
| Methanol fixation | 100% methanol, ice-cold, approximately 5–15 minutes at −20°C or on ice | Fixes and permeabilizes in one step but extracts lipids and can alter membrane-rich or soluble structures. |
| Triton permeabilization after formaldehyde | 0.1% Triton X-100 for approximately 10–15 minutes at room temperature as a mild screen | Increase only when target access is inadequate and morphology remains acceptable. Product-specific protocols may use stronger conditions. |
| Blocking | Approximately 60 minutes at room temperature | Evaluate secondary-only background rather than assuming a longer block is always better. |
| Primary antibody | Manufacturer-recommended dilution; 1–2 hours at room temperature or overnight at 4°C | Titrate concentration and compare signal pattern, positive control, and negative control. |
| Secondary antibody | Manufacturer-recommended dilution; approximately 1 hour at room temperature protected from light | Match the primary host species and include a secondary-only control. |
| Washing | Three washes of approximately 5 minutes between major labeling steps | Keep wash composition, duration, volume, and agitation consistent across samples. |
Procedure
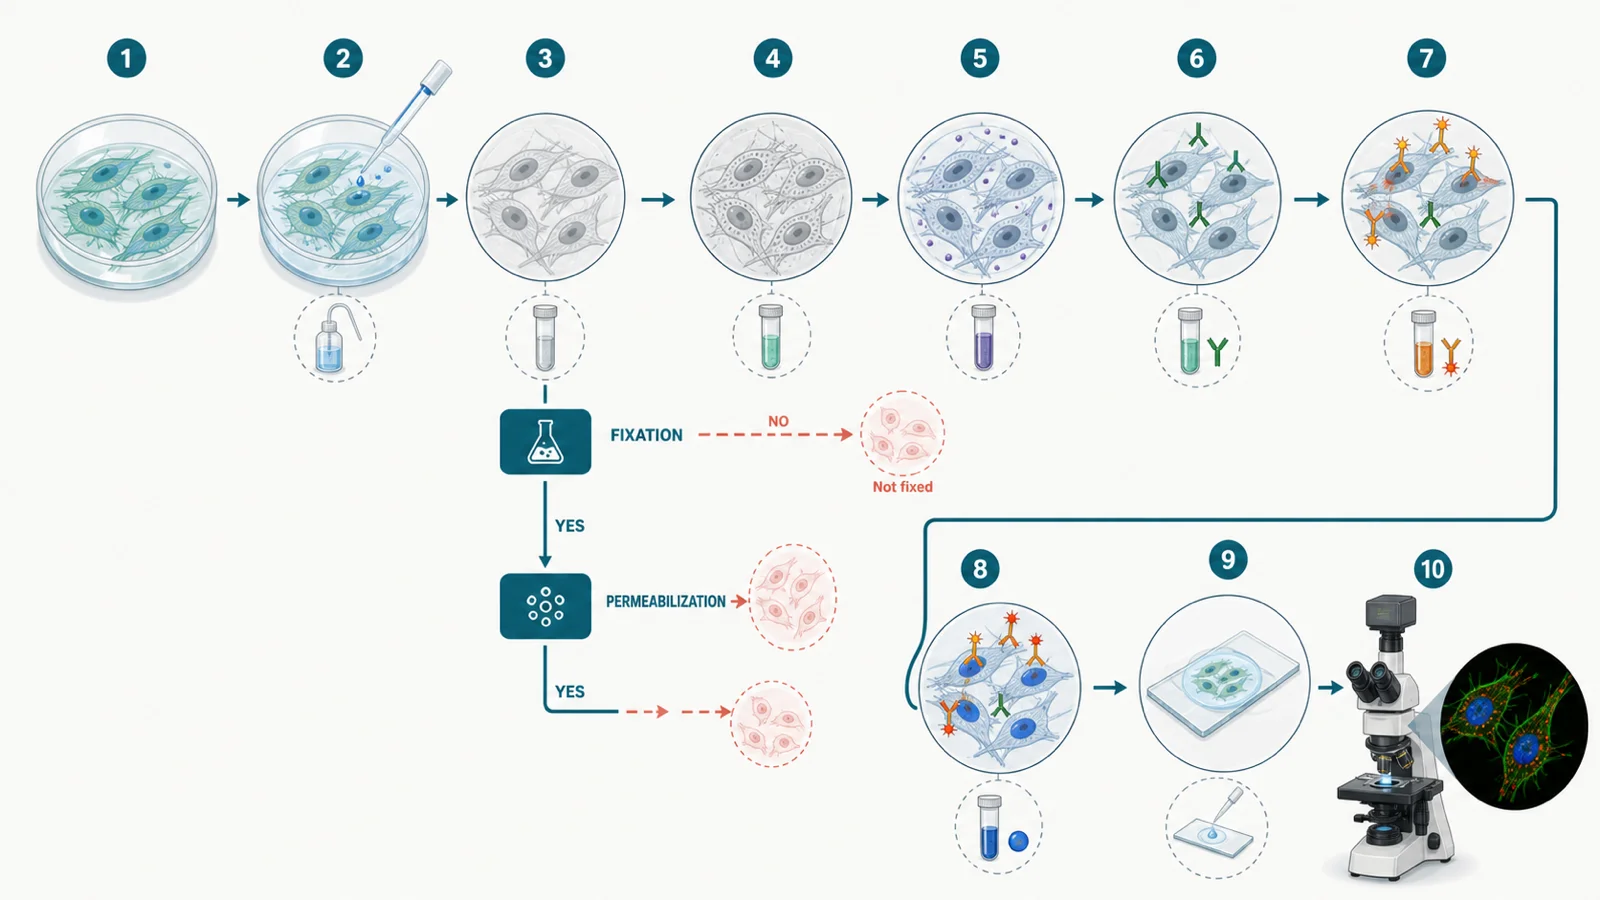
- Prepare the imaging surface and controls. Label every vessel before beginning. Include the planned positive, negative, unstained, and secondary-only samples in the same staining run where practical.
- Inspect and record the live culture. Capture representative brightfield images. Record confluence, morphology, contamination status, treatment interval, and any cell detachment before fixation.
- Remove medium and wash gently. Add buffer against the wall of the vessel rather than directly onto the monolayer. Avoid exposing cells to air for longer than necessary.
- Fix the cells. Apply the preselected formaldehyde or methanol condition. Keep time, temperature, volume, and reagent age consistent across groups. Do not combine routes unless the combination has been deliberately validated.
- Wash after fixation. Wash gently and completely remove residual fixative. From this point forward, keep the cells covered with liquid; drying can produce high background and edge artifacts.
- Permeabilize when needed. After aldehyde fixation, apply the validated permeabilization condition for intracellular targets. Omit detergent for a surface-labeling design only when the antibody and experimental question support that choice. Methanol-fixed cells generally do not need a separate detergent step.
- Block nonspecific interactions. Cover the cells fully and incubate in a humidified chamber. Prepare antibody dilutions during this period using the same defined diluent for all comparable samples.
- Incubate the primary antibody. Use enough volume to cover the complete imaging area. Record antibody identity, clone, lot, concentration, dilution, diluent, time, temperature, and agitation.
- Wash consistently. Use the same number, duration, volume, and movement for every comparison group. Do not direct a strong liquid stream onto the cells.
- Incubate the fluorescent secondary antibody. Protect from light. Use a species-appropriate secondary antibody and prevent cross-reactivity when more than one primary host is present.
- Wash, counterstain, and mount. Add nuclear stain only when it supports the analysis. Remove unbound fluorophore, prevent bubbles and compression, and use a compatible antifade mounting medium.
- Acquire controls first. Confirm sample presence, channel identity, background, and known-positive signal before imaging experimental groups. Set exposure below saturation and keep acquisition settings compatible across groups intended for quantitative comparison.
Minimum control set
| Control | What it checks | Limitation |
|---|---|---|
| Unstained cells | How much intrinsic cellular, substrate, or treatment-related fluorescence is present in each channel? | Antibody specificity or secondary-antibody background. |
| Secondary-only | Does the fluorescent secondary antibody or detection chemistry create background without the primary antibody? | That the primary antibody recognizes only the intended target. |
| Known positive | Can the staining and acquisition workflow detect the expected pattern under these conditions? | Target dependence in the experimental sample. |
| Biological or genetic negative | Does signal decrease where the target is absent or substantially reduced? | All sources of intrinsic fluorescence, bleed-through, or secondary background. |
| Single-color control | Does one fluorophore appear in another acquisition channel? | Target specificity or nonspecific antibody binding. |
When feasible, knockout or knockdown material is more informative for target dependence than an isotype control. Interpret every control in the context of sample preparation and acquisition settings.
Stop points and storage
- After fixation and washing: a short pause in buffer at 4°C may be acceptable for many assays, but labile epitopes and some phospho-targets should be processed using a validated schedule.
- During antibody staining: overnight primary incubation at 4°C is a standard planned step, not an uncontrolled stop point. Maintain humidity and sample coverage.
- After mounting: allow the mounting medium to cure as directed, then store at 4°C protected from light. Record the interval between staining and imaging.
- Avoid: allowing fixed cells to dry, repeated temperature cycling, prolonged exposure to room light, or storing quantitative comparison groups for different durations without validation.
Troubleshooting checkpoints
| Observation | Check first | Next guide |
|---|---|---|
| No or weak target signal | Known-positive sample, nuclear or morphology channel, acquisition channel and exposure, then fixation and access conditions. | No-signal workflow |
| High diffuse background | Secondary-only control, exposure saturation, antibody titration, wash consistency, and sample drying. | High-background patterns |
| Unexpected channel-wide fluorescence | Unstained cells in every channel and the contribution of medium, treatment, fixative, and substrate. | Autofluorescence by channel |
| Patchy or edge-biased staining | Liquid coverage, bubbles, drying, cell attachment, illumination field, and focus. | Uneven-staining patterns |
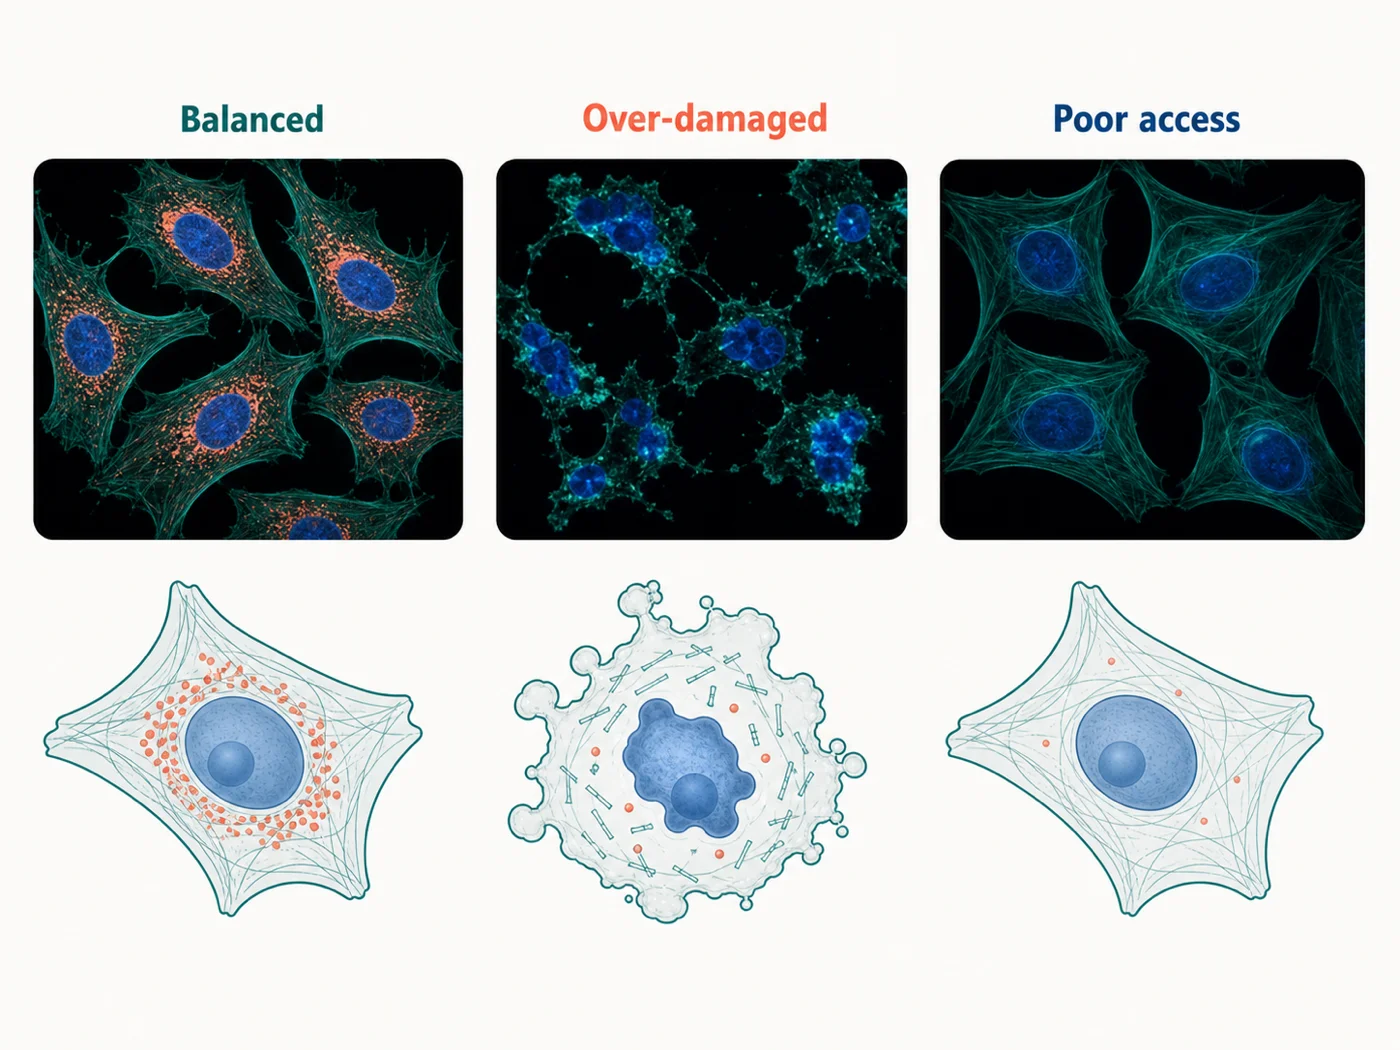
| Good signal but distorted morphology | Live-cell appearance before fixation, fixation route, detergent strength, time, temperature, and wash force. | Fixation decision guide |
What to record
- Cell line, source, passage range, authentication or contamination status, seeding density, substrate, treatment, and biological replicate
- Live-cell confluence and morphology immediately before fixation
- Wash-buffer formulation, fixative identity and preparation, duration, temperature, and volume
- Permeabilization reagent, concentration, duration, temperature, or explicit reason for omission
- Blocking reagent, antibody supplier, catalog number, clone, lot, concentration, dilution, diluent, time, temperature, and volume
- Control identities and expected outcomes
- Counterstain, mounting medium, mounting date, and storage interval before imaging
- Microscope, objective, immersion medium, camera or detector, channels, exposure, gain, binning, z-step, and acquisition date
- Raw file location, processing steps, display adjustments, field-selection rule, exclusions, and quantitative analysis method
References and protocol sources
- Immunofluorescent staining of intracellular antigens on cultured cells Manufacturer protocol
Thermo Fisher Scientific
Cultured-cell fixation, washing, blocking, antibody incubation, mounting, and storage starting conditions.
- Immunofluorescence protocol for cell-based imaging Manufacturer protocol
Cell Signaling Technology
Product-specific validation and formaldehyde-versus-methanol sample preparation.
- Immunofluorescence staining Methods paper
Julie G. Donaldson . Current Protocols in Cell Biology (2015) . DOI: 10.1002/0471143030.cb0403s69
Indirect immunofluorescence workflow, controls, fixation, permeabilization, and specimen handling.
-
S. R. Yang, B. K. Maity, and S. Chong . The Journal of Physical Chemistry B (2023) . DOI: 10.1021/acs.jpcb.3c01658
Fixation-dependent redistribution, cross-linking and organic-solvent trade-offs, and interpretation limits.
- High-quality immunofluorescence of cultured cells Methods paper
Dibyendu Bhattacharyya, Adam T. Hammond, and Benjamin S. Glick . Methods in Molecular Biology (2010) . DOI: 10.1007/978-1-60327-412-8_24
A specialized cultured-cell method illustrating why delicate structures can require protocol-specific preservation and validation.